Wednesday, February 22, 2012

Recipe: Food Network's "Cocoa-Rubbed Steak with Bacon-Whiskey Gravy"

This month's Food Network magazine was all about chocolate: how to cook and bake with it, how to temper it, where to buy the best, news about it, and more. All of the recipes in this issue incorporated chocolate in some sort of way, big or small, and a twist on the traditional "steak and potatoes" caught my eye. I don't cook red meat often, nor do I try to juggle too many things at once while I cook (in this case, steak, gravy, baked potatoes, and broccoli), so rather than play around with this recipe and make it my own the first time out, I decided to basically stick with it as is, tweaking just a few ingredients and whatnot, and it came out wonderfully. The rub on the steak has just a touch of heat and a subtle chocolate flavor that is savory rather than sweet. The gravy, a bacon-y, salty, creamy affair, goes well with the steak, and is even better on the baked potato and broccoli sides. So, kudos to you, Food Network, for a delicious, chocolate-themed steak-and-potato dinner!

(Bacon-Whiskey Gravy not pictured)


Yields: 2-4 servings (gravy serves about 6)
Prep. time: 10-15 minutes
Cooking time: 45 min.-1 hour
Difficulty: Easy to Moderate
Special equipment: Broiler pan

Ingredients

  • 1 baking potato per person (I bought the "just pop in the microwave for 7-8 minutes" baking/russet potato to save time)
  • About 2 heads of fresh broccoli, cut into florets (you can just cook half a bag of frozen broccoli to save time)
  • Butter and sour cream for the baked potatoes, if desired
For the steak
  • 1 tbsp. unsweetened cocoa powder
  • 2 tsp. paprika
  • 1/4 tsp. cayenne pepper
  • 1 tsp. packed brown sugar
  • Salt and pepper
  • 1 steak, preferably NY strip, per person (I bought two large Delmonico steaks and split one with my mom)
*The rub is enough to cover 3, 1 lb. NY strip steaks, so if you do smaller or fewer steaks, use less of the rub

For the gravy
  • 3-4 strips bacon
  • 1 leek, finely chopped (clean thoroughly, because they're very dirty; do not use the dark green part at the top of the leek)
  • 1 tbsp. all-purpose flour
  • 1/2 cup whiskey
  • 3 cups chicken broth/stock
  • 2 bay leaves
  • 1/2 cup heavy cream
  • 1 tbsp. butter
  • 2 tbsp. dried parsley
  • Salt and pepper

Directions
Mix together the ingredients for the rub and lightly rub the mixture into both sides of each steak. Set the steaks aside on a broiler pan and turn on the broiler setting in your oven in preparation for the steaks. Bring a medium pot of water to a boil in preparation for cooking the broccoli. In a large pan, cook the bacon over medium heat until crispy, then remove the bacon and place on paper towels to soak up excess grease. In the pan with the bacon grease, add the diced leek and cook until tender (about 3-5 minutes). Add the flour, stir to combine, and cook for about 1 minute. Add a little butter if desired. Remove the pan from the heat and add the whiskey. Return the pan to medium high heat and cook the mixture, stirring occasionally, until the mixture is slightly thickened (about 3 minutes). Add the bay leaves and chicken stock, bring to a boil over medium high heat, and cook until the mixture is reduced by about one quarter (about 8 minutes). Slowly whisk in the heavy cream, then allow the gravy to simmer for about 7 minutes, stirring occasionally. While it's cooking, put the steaks in the oven and broil for 8-15 minutes (less time will yield medium rare steak, more time will yield medium to medium well), turning occasionally. Returning to the gravy, crumble the cooked bacon and add it to the gravy, along with the butter and parsley, then stir to combine. The gravy should be just thick enough to lightly coat the back of a spoon (add a little cornstarch-and-water to make it thicker, if desired) and will be a cream color when it's done. Reduce the heat to keep it warm. Cook the broccoli florets for approx. 5 minutes in boiling water and heat the baking potatoes in the microwave for 7-8 minutes. If you've timed this right, everything should finish up at about the same time. The steak, once removed from the oven, should be allowed to rest for a few minutes on a cutting board before being plated and cut. Serve the meal with a gravy boat full of the gravy.

This is a delicious little twist on a classic and is quite a filling meal. Fresh broccoli and fluffy baked potatoes are the perfect compliment to the steak, coated in this lightly sweet-spicy rub. The gravy, a salty, creamy, buttery mixture, goes perfectly with every part of this dish.

Tuesday, February 21, 2012

Recipe: Roasted Red Pepper Cream Sauce

My mom's request that I make something for dinner that my dad and I would like that she wouldn't mind missing (she was out with friends tonight) led me to bell peppers. My mom loathes just about any kind of pepper, particularly bell peppers—she picks around them when I cook dishes that include them and she can taste the slightest hint of them in a dish (though, strangely, she makes a roasted red pepper soup that she will actually eat). My dad and I, on the other hand, are pepper fans, so I wanted to create a pepper-centric dish for us to enjoy. This creamy bell pepper sauce, tossed with pasta and chicken, creates a quick and easy meal that's perfect for any season. Bell peppers, heavy cream, pine nuts, and a handful of other ingredients blend to create a light, spicy-sweet sauce that's creamy and delicious.


Yields: Approx. 2 cups
Prep. time: 10 minutes
Cooking time: 10-20 minutes
Difficulty: Easy
Special equipment: Food processor

Ingredients

  • 2, 12 oz. jars roasted red bell peppers (or approx. 2-3 fresh red bell peppers, roasted)
  • 1 small onion, sliced
  • 2 cloves garlic
  • 1/3 cup pine nuts, toasted*
  • 5-10 leaves fresh basil
  • 1/4 cup extra virgin olive oil
  • 2-4 tbsp. grated Parmesan cheese
  • 1 tbsp. butter
  • Salt and pepper, to taste
  • 1/2 pint heavy cream
*To toast the pine nuts: preheat the oven to 350*F and spread the pine nuts evenly over the sheet. Toast in the oven for 3-6 minutes, or until fragrant and light golden-brown. Pay attention!—These are easy to burn.


Directions
Add all of the ingredients, except the heavy cream and butter, to the food processor and pulse to blend. The finished mixture will be slightly textured and thoroughly blended. Pour the mixture into a medium pot over medium heat and bring to a simmer. Slowly whisk in all of the heavy cream, then add the butter and stir to blend. Adjust seasonings as desired (if anything, add more salt, pepper, and maybe a splash of lemon juice or dash of garlic powder). Serve hot over pasta, chicken, or food of your choice.

I tossed penne pasta and diced chicken with the sauce

This sauce is easy to put together and it's packed with flavor without being overwhelming. Bell peppers aren't very spicy, but that little bit of heat they do have, along with their sweetness, blends perfectly with pungent garlic and onion, toasty pine nuts, fresh basil, and nutty Parmesan. The heavy cream and butter give this sauce a light, creamy texture that makes this dish filling without feeling heavy or overly rich.

A variation on this sauce, using orange and green bell peppers instead of red bell pepper

Wednesday, February 15, 2012

Recipe: Fettuccine and Sweet Italian Sausage in a Parmesan-Leek Sauce

I saw a recipe for Winter Pasta with Chorizo while browsing through recipes on Tastespotting. Intrigued by the use of leeks and cabbage in a sort of pesto-cream sauce hybrid, I saved it to my "Recipes to Try" Pinterest board and decided yesterday, a drizzly, chilly Valentine's Day, would be the ideal day for this warm, wintry pasta dish. I made homemade fettuccine (with help from my pasta maker) and tweaked the ingredients just a bit to make it just right, and the result was a delicious, light but flavorful pasta dish, permeated with the delicate, onion-y taste of the leeks and the nutty, slightly tangy flavor of Parmesan cheese. Sweet Italian sausage is packed with flavor and just a touch of heat, and it paired well with the creamy sauce and medium-width pasta noodles.


Yields: 4 servings
Prep. time: 10-15 minutes
Cooking time: 15-20 minutes
Difficulty: Easy
Special equipment: Food processor

Ingredients
  • 2 leeks, washed/soaked with the tops cut off, cut into big pieces (peel apart the layers of the leek and soak them in a large bowl—leeks are incredibly dirty, so they need to soak to get clean)
  • 4 garlic cloves, peeled
  • 3 cabbage leaves, removed from stalk and washed or two small handfuls of pre-shredded cabbage (I found a bag of shredded cabbage for coleslaw, with no other veggies included)
  • 3 tbsp. oregano leaves
  • 1/2 tsp. dried grated lemon peel
  • 1 cup grated Parmesan cheese
  • 1/2 cup extra virgin olive oil
  • 2 tbsp. fresh lemon juice
  • 1-4 tbsp. heavy cream
  • 2-3 links (casings removed) or approx. 1/2 lb. sweet Italian sausage, pulled into small pieces 
  • Olive oil and butter, for cooking the sausage
  • 8-12 oz. fettuccine
  • Salt and pepper, to taste
  • White pepper, to taste

Directions
Bring a large pot of salted water to a boil, then add the leeks and garlic and cook them for 3-4 minutes. Add the cabbage and cook for an additional 2-3 minutes—everything will be tender when done. Use a slotted spoon to quickly remove the leeks, cabbage, and garlic when they're done cooking, and put them in a food processor. Add the olive oil, lemon juice, lemon peel, Parmesan, oregano leaves, and heavy cream to the food processor and pulse to blend. Add salt, pepper, and white pepper, to taste. Once blended (the mixture won't be completely smoothe—it'll have a little texture to it), transfer it to a medium saucepan and heat over low heat. While the sauce is cooking, heat a little olive oil and about a tbsp. of butter in a medium saute pan over medium heat, then add the sausage and cook until browned and cooked through. While the sausage is cooking, bring a large pot of salted water to a boil and cook the fettuccine according to package instructions, then drain and return to the pot. Add the sauce to the pasta and toss to combine, then add the cooked sausage and toss to combine. Serve with a little Parmesan cheese and fresh oregano.

The sauce is the star of this dish—that soft onion-y flavor of the leeks, the fresh oregano, nutty Parmesan, and earthy cabbage create a unique flavor and texture that's sort of like a creamy, light pesto, or a textured cream sauce. Sweet Italian sausage adds texture and more flavor to the dish and fettuccine is the prefect pasta for this meal. The sauce can be prepared ahead of time and stored in the fridge up to a few hours before use, and the meal reheats wonderfully.

Tuesday, February 14, 2012

Recipe: Valentine's Day Conversation Hearts (White Chocolate-Covered Red Velvet "Truffles")

I absolutely love sending packages filled with baked goods or other edible treats to my boyfriend, John, just for fun (to help him get through all the hours of studying, reading, and writing he does for law school). I knew I wanted to make something new and special for him for Valentine's Day, so I spent a few hours last week researching ideas, before coming across a fun cake pop idea that drew inspiration from those chalky, not-so-great-but-oh-so-traditional Conversation Hearts. I tweaked the idea to make it work for me, and came up with a box full of white chocolate-covered red velvet "truffles" made to look like Conversation Hearts. To make the process a little easier, I used a boxed red velvet cake mix and pre-made cream cheese frosting, and I found this amazing cookie icing that hardens within minutes and used this to write messages on the hearts.
These little hearts took quite a lot of time and a little skill to make, but they turned out great and, from what I can tell, my boyfriend really enjoyed them. :)


Yield: Amount will vary depending on the size of the cookie cutter you use and how thick you make the "truffles"
Prep. and Cooking time: Approx. 2-4 hours total
Difficulty: Easy to Moderate
Special equipment: Heart-shaped cookie cutter, wax paper, double boiler (or a "makeshift/home made double boiler: a pot and a glass or ceramic bowl that sits partly down inside the pot), cookie sheets

Ingredients
  • 1 box red velvet cake mix, prepared, baked, and cooled (I used Duncan Hines brand; it called for the mix, eggs, water, and vegetable oil, and most cake mixes will require these ingredients, so have them on hand)
  • 1, 16 oz. container cream cheese frosting (I used Duncan Hines brand)
  • 2, 24 oz. bags white chocolate chips (you will probably have some left over)
  • Food coloring (the standard red, blue, green, yellow)
  • Hard icing for writing on the finished "truffles" (I found a fast-hardening cookie icing that conveniently came in a packet with a piping tip, so it made it very easy to write)


Directions
Scrape the cooled red velvet cake into a large bowl and crumble it into fine pieces/crumbs. Add part of the cream cheese frosting into the cake crumbs and, using a large spoon, spatula, or your hands (I used my hands), mix the frosting into the crumbs. Continue adding and mixing frosting into the cake crumbs until the mixture is completely blended and the cake is dark red, dense, and able to be rolled into a ball (I used almost all of the frosting). Put a piece of wax paper on a cookie sheet and dump the red velvet and frosting mixture out onto the sheet. Spread out the mixture and flatten it out over the entire sheet until you have an even layer (about 1/2-1 inch thick) of cake mixture. Press the heart-shaped cookie cutter into the cake to cut out the desired number of hearts without actually pulling out the cut hearts, then place a piece of wax paper over the mixture and let it chill in the fridge. While the mixture is chilling, melt 1/2-1 cup white chocolate chips in the double boiler (you can melt them in the microwave, but this method can burn the chocolate if you're not careful). Remove the cake from the fridge and gently remove the cake from around each heart cut-out or gently lift the heart-shaped pieces up and out of the pan, then place them on a new wax paper-covered cookie sheet. Pour the melted chocolate into a small bowl and add the desired amount of food coloring to create one color. Using a spoon, gently smear some of the colored chocolate underneath one cake heart on the wax paper, place the heart back on the chocolate, then pour some on top of the heart and smooth to coat. Repeat with a few more hearts (I had three hearts of each color, creating 15 hearts). Melt a new batch of chocolate, transfer to a small bowl, mix in a new color, and repeat the coating process. Repeat this process until each heart is covered (I apologize for not having pictures of this process—when I get into a cooking or baking project, practical thoughts like "maybe I should take pictures so my readers know what I'm talking about" don't seem to cross my mind). Any excess cake mixture can be rolled into balls and covered in melted chocolate to create actual "truffles" (see picture at the end of this post). Place the coated hearts into the fridge and let them chill until the chocolate is completely hardened. Remove from the fridge and, using hard icing and a small piping tip, pipe out messages on the hearts (I looked up images of Conversation Hearts online to give me inspiration). Allow the icing messages to set completely before stacking the hearts. Keep the hearts in the fridge—they're best served slightly cold, with a warm cup of coffee, tea, or hot chocolate (and the one you love by your side).


These little hearts are whimsical, delicious, and absolutely perfect for Valentine's Day! They take some time and patience to make, but they're well worth it. Just be sure to keep these in the fridge to keep them fresh (they taste better cold anyway)!

Truffles I made with the leftover cake mixture

Monday, February 13, 2012

When the moon hits your eye, like a big pizza pie, that's amore...

I shared a recipe for pizza sauce and a recipe for pizza dough, along with pictures of each, but I'm sure some of you are wondering what happened to the actual completed pizzas. Well, the original batch, made for our Super Bowl party, got assembled, baked, and eaten so quickly, I didn't get a chance to take pictures. Fortunately, with one ball of dough and a rather large pot of sauce left over, that meant my parents and I had "pizza: round two" a few days after the Super Bowl and I had a chance to capture our creation on camera. We each have pretty different pizza topping preferences, so we had a somewhat organized mix of pizza sections containing a mushroom-green pepper-onion mixture (with one or two surprise sausage pieces nestled in), sausage and basil, and plain cheese (with a scattering of sausage) and the result was a cheesy, saucy success.

Our concoction, before baking

Cooked until golden brown and bubbling. Yum!

So, if you haven't already tried making your own pizza, do it! It's such a nice change from the usual frozen, delivery, and fast food pizzas and it's so easy to make.

Wednesday, February 8, 2012

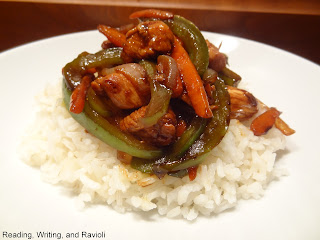
Recipe: Stir-Fried Chicken and Vegetables with Rice

In an effort to clear out the fridge, and at the prompting of my mom, who wanted me to make something for my dad and I to eat that she wouldn't mind missing out on (she had a luncheon earlier today and wasn't interested in dinner), I decided to pull together some sort of stir fry. Bell peppers, onions, and carrots are perfect for the quick cooking of a stir fry, and, paired with marinated chicken, white rice, and a splash of an Asian-style sauce, it makes for a delicious and easy meal. Because I just made this for my dad and I, I scaled down the ingredients so we didn't end up with a ton of leftovers—we still ended up with enough for four small servings or two large servings, but adjust as you see fit (if anything, add more vegetables, use two chicken breasts, and cook up a little more rice; you should have enough of the marinade and sauce). Next time I make this, I'll be sure to add more pictures of the process (though, I promise, it's quite easy to make).


Yields: 2-4 servings
Prep. time: 15 minutes
Cooking time: 30 minutes
Difficulty: Easy

Ingredients

  • 1 cup dry white rice (yields 3 cups cooked)
  • 1-2 chicken breasts, cut into 1 inch cubes
  • 1 green bell pepper, julienned (thinly sliced)
  • 1 medium onion, julienned (cut the onion into thin slices like onion rings, then cut those rings in half)
  • A large handful of baby carrots, sliced into two or three thin pieces; or 1-2 large carrots cut in half width-wise and then cut into thin pieces)
  • Peanut oil (enough to lightly coat the bottom of a large pan)
For the chicken marinade
  • 1-2 garlic cloves, minced
  • 1/4 tsp. ginger root, grated
  • 1 tsp. rice wine vinegar
  • 1 tsp. oyster sauce (not really necessary, but it adds some nice flavor)
  • 1 tsp. sesame oil
  • 1 tsp. mirin or sherry
  • 1/4 cup soy sauce (I use low sodium)
For the "sauce" (you won't need all of this in the stir fry)
  • 1/4 cup soy sauce (low sodium)
  • 1 tsp. sesame oil
  • 1 tsp. mirin or sherry
  • 1/4 tsp. ginger root, grated
  • 1 garlic clove, minced
  • 1 tbsp. cornstarch
  • A pinch of crushed red pepper flakes

Directions
Cook the rice according to package instructions (I used store brand rice that cooks in simmering water with a little butter for approx. 20 minutes; just keep in mind the cooking time for the rice you choose because the chicken and veggie mixture only takes about 15 minutes to cook and you want the chicken and the rice to be done at about the same time). In the meantime, in a medium bowl, combine the ingredients for the chicken marinade, add the chicken to the mixture, and stir to coat; set aside. In a small bowl, combine the ingredients for the "sauce" and stir vigorously to combine (stir it occasionally while working on everything else so that the cornstarch remains mixed in); set aside. Heat peanut oil in a wok or large, deep pan over medium-high heat. Add in the pepper, onion, and carrot and cook until the colors brighten and the veggies start to brown ever-so-slightly, then push them aside to one side of the pan. Toss in the chicken on the other side, being careful not to pour the marinade in with it, and cook through until slightly pink in the middle, then reduce to medium heat and mix all of the veggies and chicken together. Cook until the chicken is completely cooked through, but tender. Add in a little bit of the sauce (just a few spoonfuls) and stir to combine; you don't need much of it, just enough to lightly coat everything—in fact, you'll have a good bit left over, but it's better to have more if you want it. Serve the mixture with the rice. 

The marinade and a splash of the sauce create a delicious salty-sweet flavor that blends perfectly with the tender chicken, crisp-tender vegetables, and fluffy white rice. The dish is quick and easy to make (as are so many of the recipes I've shared) and it's a nice, somewhat healthier change from takeout Asian food from your favorite local restaurant.

Sunday, February 5, 2012

Recipe: Traditional Red Pizza Sauce


As I shared in my basic pizza dough recipe post, my mom wanted me to help make homemade pizza for a Super Bowl party she's hosting, and I worked off of a recipe from Food.com to create a delicious red sauce. This sauce has a TON of ingredients, which all blend together to create a rich, flavorful sauce perfect for pizza, or even as a pasta sauce. It's easy to pull together and the flavors deepen when you allow the sauce to simmer for a while. Now, because I had to make up a big batch (enough to cover at least four pizzas), and was editing the original recipe as I went along, the amounts listed here are measured for a larger amount and I have not done the math to edit it to work for a single pizza—I trust you can figure this out. This sauce freezes well, and can be stored for a few months, so you can easily make this recipe as is and freeze the excess for future pizzas or for other uses (pasta, dipping sauce for mozzarella sticks or fried eggplant, etc.; we still had left over after making about five or six pizzas).


Yields: Approx. 3.5 quarts
Prep. time: 10 minutes
Cooking time: 30-60 minutes
Difficulty: Easy
Special equipment: Blender, food processor, or immersion/stick blender

Ingredients

  • 6-8 tbsp. extra virgin olive oil
  • 4 tbsp. butter
  • Approx. 2 cups onions, chopped (I used 4 small-to-medium onions)
  • 4 garlic cloves, minced
  • Approx. 45 oz. tomato sauce (I used a 29 oz. can, and then added a 15 oz. can when I realized I needed more)
  • 1, 14.5 oz. can diced tomatoes
  • 2, 6 oz. cans tomato paste
  • 6-8 tbsp. grated Parmesan cheese
  • 3-4 tsp. dried basil
  • 3-4 tsp. dried oregano
  • 3-4 tsp. dried fennel seeds
  • 1 tsp. dried Italian seasoning
  • 3 whole bay leaves (remove these from sauce before pureeing)
  • 1/2 tsp. crushed red pepper flakes
  • Approx. 1 tsp. black pepper
  • Approx. 2 tsp. salt
  • Approx. 2 tsp. sugar

Directions
In a large pot, heat the butter and olive oil together over medium heat. Add the onion and garlic and cook until soft and slightly transparent. Add the tomato sauce, diced tomatoes, and tomato paste and stir to combine (the paste is thick, so be sure you stir it vigorously to break it down in the sauce). Add in the remaining ingredients (the cheese, herbs, spices, sugar, and salt) and stir to combine. Briefly bring the sauce to a boil, then immediately reduce the heat to medium low, cover the pot with a lid, and let it simmer for 30-60 minutes (I cooked it for 30 minutes; the longer you cook it, the more the flavors can blend). Remove the bay leaves from the sauce. 
To blend: If using an immersion/stick blender (this is what I did, because it's the easiest and creates the least amount of dishes to wash), immerse the blender into the sauce in the pot and pulse to blend, stirring as you pulse, until the bigger chunks (onion, diced tomatoes, garlic) are broken up and blended into the sauce and the sauce is smooth. If using a blender or a food processor, pour as much as the sauce as possible (without overloading) into the holder on the unit and blend/pulse until smooth. Pour the smooth sauce into a clean bowl. Repeat this process with the remaining sauce until it's all blended and smooth. Sauce can be kept in the fridge for a few days or frozen for a few months. 

This sauce is a little sweet, a little spicy, a little tangy, and oh-so-good. Fennel and oregano are classic pizza sauce flavors, and the combination of the remaining flavorings is just right. Allowing the sauce to simmer for a while gives it a great depth of flavor, making it the perfect addition to any pizza, pasta, or other Italian-esque dish.

Recipe: Basic Pizza Dough

Being the good little cook-daughter that I am, I agreed to help my mom out with food for the Super Bowl party she hosted tonight. I mentioned that an Italian bread recipe we tried in class the other week can also work as pizza dough and she was instantly hooked on the idea of making homemade pizza. I pulled a recipe for pizza sauce from Food.com and edited it a bit (recipe in a separate post), and we used the basic pizza dough recipe from Mark Bittman's How to Cook Everything. The dough is incredibly easy to pull together and takes just 1 to 2 hours to rise. You can mix it by hand, or with a mixer or food processor—my mom and I made five batches of dough, using both the KitchenAid mixer and the food processor, and we found that the food processor blended the ingredients together faster and more evenly, so the recipe below is based around the use of a food processor. The result was soft dough that crisped up just right when baked and made for a delicious slightly crunchy, chewy crust.

The dough, fresh out of the food processor

The dough, after rounding

The dough, risen to twice its size


Yield: Makes 1 large or 2 small pizzas
Time: 10 minutes to blend and knead, 1-2 hours to let rest and rise
Difficulty: Easy
Special equipment: Food processor or mixer

Ingredients

  • 1 tsp. instant or rapid-rise yeast
  • 3 cups all-purpose or bread flour (we used bread flour), plus more for dusting
  • 2 tsp. kosher or sea salt
  • 1 cup of room temperature water, plus more if needed
  • 2 tbsp. extra virgin olive oil, plus more to coat the bowls used to hold the dough

Directions
In a food processor, add the yeast, then the flour, then the salt, and blend. With the food processor running, gradually pour in the water—the flour mixture will start to look a little darker and wet, and then it will pull together into a thick, sticky dough. Gradually add the olive oil to the dough and continue to blend until the dough is pretty much all pulled together into a ball and is slightly sticky. If it's very sticky (sticking to your hands and very hard to get off), add just a pinch more flour and blend. Remove the dough ball from the food processor and place on a lightly floured surface. Gently knead the dough for just a few seconds, until the dough looks smooth. Round into a ball and place in a bowl that's been lightly brush with olive oil. Cover tightly with cling wrap and set aside in a warm, dry place (it's winter here, and quite cold, so we just put the bowls in the warmest room of the house, which happens to be a living room area at the front of the house). Let sit for 1-2 hours until the dough ball is twice its original size. If you want the dough to rise more slowly, place the bowls in the refrigerator for 6-8 hours. Once rested, remove the now-larger dough ball and prepare your pizza, or, if you plan to use it up to 24 hours later, tightly wrap it in cling wrap and place it in the fridge until ready to use. If you want to use it later than a day later, wrap it tightly in cling wrap and freeze for up to one month.

This dough is very easy to make and it's ready for your favorite pizza sauces and toppings in no time! If you want to use a mixer to make this, follow the same steps, but use your dough hook to blend the dough. Traditional pizzas (we used a red sauce, cheese, and a variety of toppings) should take about 10-15 minutes to cook.