Friday, September 30, 2011

Recipe: Potato Soup

Words that describe today: Cold. Rainy. Grey. Dreary. Autumn. Cold (did I already say that?). I spent my morning in a warm kitchen for my Foods 1 class, learning how to make Espagnole (one of the five mother sauces; a brown sauce), variations on that sauce, and tomato sauce. When I got home, I changed into pajamas, curled up in bed under a mound of blankets with the space heater on, and basically went into a brief hibernation mode, napping for two hours. When 5:00PM rolled around, all I wanted was a warm, hearty dinner, which is lucky for me, because I picked up the ingredients for my cousin's fabulous potato soup late last week and it's the perfect meal for a chilly day in the North. This is yet another meal I tried at my cousin's place over the Labor Day weekend, and it's an original "Katie" recipe—a recipe that I'm glad she shared with me. The soup has small chunks of soft, warm potato in a thick, creamy base. Topped with crispy bacon, fresh green onions, and grated cheddar cheese, it's the perfect meal for a cold and damp autumn evening.


Serves: 4-6
Prep. time: 10-15 minutes
Cooking time: 30-40 minutes
Difficulty: Easy

Ingredients
  • 4-6 strips bacon, cut into 1 inch cubes/strips
  • 2 tbsp. butter
  • 5-6 garlic cloves, minced
  • 2 medium leeks, diced (be sure to clean these thoroughly by letting them soak in water and by cutting off the tops—they are incredibly sandy and dirty and you don't want that grime getting into your soup)
  • 1/4 cup flour
  • Approx. 3 lbs. potatoes (about 4 medium potatoes or 8 small potatoes), diced (smaller pieces will cook faster)
  • 3 cups chicken stock
  • 1 & 1/2 cups water
  • 1 cup heavy cream
  • Salt and pepper (and white pepper), to taste
  • Corn starch, if necessary (a small—no more than 1/4 cup, and likely less than that—mixture of cornstarch and water can be added to the soup to help thicken it if it's too thin)
  • Shredded cheddar cheese, bacon, and diced green onions, for garnish and taste (I set out about a 1/2 cup of each)

Directions
In a large pot over medium high heat, cook the bacon until crispy, but not overly brown or burnt. Remove from pot, set it aside on paper towels to soak up some of the grease, then use that as your bacon garnish at the end (if I remember correctly, my cousin cooked two small batches of bacon and actually included some of that bacon in the soup, but I chose not to do that). Drain all but 2 tbsp. of the bacon grease into a small bowl and set aside (you may want to add a little more to the soup later—that's what I did, to add a little more flavor). Add the butter to the pot, then add the garlic and leeks, cooking them until they are slightly soft. Add the flour and stir around, making a sort of roux (this helps thicken the soup a bit). Cook until the butter and grease mixture is incorporated into the flour and there is no longer any flour smell. Turn the heat up to high, add the chicken stock to the pot and deglaze it (use a spoon or spatula to scrape the brown bits off the bottom of the pot). Add the water and heavy cream and stir to combine. Add the potato chunks and cook until they are cooked through (15-20 minutes). If the soup seems too thin, add a little of the cornstarch-and-water mixture and continue to cook, adding more as needed, until the soup is thick enough to coat the back of a spoon. If your soup is too thick, add a little water to thin it out. Add salt and pepper (and white pepper), to taste. Serve topped with bacon crumbles, shredded cheddar cheese, and diced green onions.

This soup is creamy, hearty, and rich without being overwhelmingly rich. The cheddar cheese, green onions, and bacon add a punch of flavor to the dish, as well as some crunch and texture. It's the perfect dish for a cool autumn evening or a cold winter day and it reheats wonderfully.

Tuesday, September 27, 2011

Recipe: Pad Thai

If you read my last post, you'll recall that I'd planned to make four or five new dishes for dinners last week, but unfortunately, I was only able to try one recipe due to busy evenings and a trip out of town this past weekend. I guess the upside to this is that all of the ingredients for the dinners this week are ready and waiting for me in the fridge, though, as I learned (and feared), some ingredients go bad quickly, which can really throw a wrench in dinner plans. Anywho, I had a bag of half-bad bean sprouts and some slightly wilted cilantro that desperately needed to be dealt with, so I made sure that my cousin's pad thai recipe was the first on my list of things to make this week, and fortunately, it worked out well (after picking out the good sprouts and good cilantro leaves, haha). This dish has a really interesting (and some might think weird) combination of flavors and trextures—crunchy salty peanuts, crisp green onions, tender chicken and rice noodles, tart lime—which is what drew me to it. My cousin first made this dish for me during a visit to her college apartment when I was a senior in high school. I was wary of this new dish, having, at this point, gotten used to lots of pasta dinners and my mother's various "chicken and *insert starch and vegetable side dish here*" meals (all delicious, but very "normal" compared to this pad thai dish), but I was pleasantly surprised with the unique flavors. We had this dish again when I visited her this past Labor Day weekend and I made sure to have her write the recipe down for me so I could make it for my parents. It's a delicious dish that you can make up in a big batch (like I did) or make in individual portions to allow for more personalization by the people who will eat it. I'm kind of estimating ingredients because it really comes down to preference, so you can use more or less of each thing as you see fit—I apologize if this is confusing, but just go with your gut. Obviously, if you make and plan to use all of the noodles, you should plan to buy more of each of the other ingredients. Remember, you can always add more, and it reheats well, so don't worry if you end up with a lot.


Serves: 4-6
Prep. time: 20 minutes
Cooking time: 10-20 minutes
Difficulty: Easy

Ingredients
  • 8-16 oz. rice noodles (I bought A Taste of Thai brand; you can use any width—my cousin uses wide, I used a thinner noodle; I made up a whole box of noodles and tossed them in as desired)
  • Approx. 2-4 chicken breasts, cubed (small pieces work best because they cook faster)
  • Approx. 2 bunches green onions, chopped
  • Approx. 1-2 bags (1-3 cups?) bean sprouts
  • Approx. 1 container (a few ounces) fresh cilantro
  • Approx. 2-4 eggs, scrambled
  • Approx. 1 cup peanuts, whole or coarsely chopped
  • Approx. 3-6 limes, cut into wedges
For the sauce:
  • 1/4 cup packed brown sugar
  • 1/4 cup fish sauce (it smells kind of like cat food, which is obviously not appealing, but it tastes wonderful once it's cooked and added to the noodle mixture)
  • 1/2 cup tamarind (this can be hard to find—I looked up substitutions for it and found that certain fruit juices, like orange and lime, can be used; I used the juice of 3 limes instead of tamarind and I think it tasted good)
  • 1 tsp. chili garlic sauce (I didn't have this, so I just sprinkled in a dash of garlic powder and a dash of chili powder)

Directions
Follow the package instructions for cooking/soaking the noodles (the brand I used said to soak the noodles in very hot water—I boiled water, then poured it in the bowl—and soak for at least 30 minutes). You don't want them to be super soft and soggy, but you don't want them to be too firm either.

If cooking one large batch: In a large hot pan or wok, heat about 1 tbsp. oil (a mix of peanut and canola is what my cousin recommended; don't use olive oil). Add the chicken and cook until just cooked through. Add the noodles (as much as you want) and mix them with the chicken. Add the green onion, sprouts, peanuts, and scrambled egg (make sure it's broken up into small pieces). Add the sauce and mix and let it cook for a few minutes, until the noodles and chicken soak up the sauce, the peanuts start to brown lightly, and the green onions and sprouts are crisp yet tender. Serve topped with fresh-squeezed lime juice and cilantro, if desired. Additional peanuts, fresh sprouts, and fresh green onion may be set out in small bowls so people can add more to their dish if desired, and cilantro and lime can also be set out in bowls.

If cooking in individual batches/per person: Basically, you'll do the same as above, but in smaller portions. Ask each person what they want and how much and add a smaller amount of noodles and sauce. Serve in the same way as above.

This dish combines interesting textures, tastes, and smells to create a delicious, tart, nutty, sweet dish. The bright, clean taste of the lime and cilantro add a burst of flavor to the sweet green onion, tender chicken, and salty peanuts. The sauce is a delicious mix of sweet, from the brown sugar, and salty, from the fish sauce, and the soft rice noodles easily soak it up, making them incredibly flavorful. Feel free to play around with the ingredients—subsitute shrimp for chicken, try cashews instead of peanuts, or experiment with other vegetables. This dish reheats really well, especially if you warm it back up in a pan with a little bit of oil rather than in the microwave (we actually had the leftovers for dinner tonight, along with fruit salad from my grandma and some leftover desserts from a party last week—an attempt to clean out our overloaded fridge, haha).

Wednesday, September 21, 2011

Recipe: Baked Spinach, Tomato, and Chicken Pasta

I'm notoriously bad about taking multiple grocery store trips during the week instead of getting all my shopping done in one trip. I'm also terrible about wasting certain ingredients, like heavy cream, extra veggies, and random ingredients that I don't use often (like ricotta cheese or plain yogurt). My other bad habit is not doing the math before I make a recipe: cooking for three people means I usually follow recipes that serve four people, but sometimes I buy too much of each ingredient or I accidentally make too much when I cook a meal. That all being said, I was determined to at least get one of these things right this week, so I tackled bad habit number one: I picked out four recipes and did all of my shopping on Sunday. Unfortunately, my parents failed to mention that there would only be one night this week that we'd all be home for dinner. Even more unfortunate, they decided they wanted to go out to eat that night. So, I've got all of these wonderful recipes to make and fresh ingredients slowly going bad in my refrigerator and I'm pretty bummed out. Luckily, I got a chance to cook for my dad and myself tonight while my mother was out at an event with friends, and I decided to try one of the recipes I'd picked out for this week: baked spinach and chicken pasta (adapted from this recipe). Wilted spinach, fresh tomatoes, and melted mozzarella pair perfectly with warm pasta shells and diced, sauteed chicken. (On an unrelated note, my birthday is this time, next week, and I'm sincerely hoping that I get a new camera and a spotlight, because I assure you, it will improve my pictures exponentially; for now, bear with me).


Serves: 4
Prep. time: 10-15 minutes
Cooking time: 40 minutes
Difficulty: Easy

Ingredients
  • 1/2 lb. (8 oz.) medium pasta shells
  • 2-3 boneless, skinless chicken breasts, diced
  • Olive oil
  • 4 cloves garlic, minced
  • 1/2 tsp. salt
  • 3-4 cups fresh spinach, chopped
  • 1/4 cup white wine
  • 3 tomatoes, chopped
  • 8 oz. mozzarella cheese (I used a ball, and diced it into cubes, but you can use shredded cheese, slices, or whatever preparation you prefer)

Directions
Preheat the oven to 350*F. Bring a medium pot of salted water to a boil, then cook the pasta according to the package instructions (about 11 minutes). Drain and set aside, covered.
Heat a little olive oil (enough to just cover the bottom the pan) in a large pan. Add the chicken and cook it until it is lightly browned and mostly cooked through (about 10 minutes). Add the minced garlic and cook for about 2-3 minutes. Add the spinach, white wine, and salt and cook until the spinach begins to wilt. Add the tomatoes for just a minute to heat them up a bit. Add the pasta to the pan with the chicken and spinach mixture and toss to mix. Place the mixture in a casserole dish, top with mozzarella cheese, and bake for 25 minutes. Serve topped with Italian cheese and seasonings of your choice.

Topped with dried Italian seasoning, dried basil, and some Italian cheese

The flavors in this dish are delicate, so you might like to add a little extra seasoning once you've served the meal. This is the kind of dish that you can easily experiment with—I've already re-imagined this dish with sun-dried tomatoes instead of fresh tomatoes, to give it a little kick, and fresh basil mixed in with the spinach to add some fresh, crisp flavor. You can play around with different melting cheeses, substitute shrimp for chicken, add fresh herbs to the spinach mixture, or even try a different type of pasta—that's the beauty of this dish: you can make it any way you want it. The version I've shared is light and delicious though, and really easy to throw together on a busy weeknight.

Monday, September 19, 2011

Sunday Brunch (recipes and tips included)

Three weeks ago, on our first "real" day of Foods 1, we had "Breakfast Day," meaning the topic covered and food cooked that day all fell into the category of "breakfast." We learned how to flip an egg (I give a brief, simple how-to here) and how to properly whisk eggs for scrambled eggs and omelets—basically, if you think you've whisked them enough, keep going. The goal with whisking eggs is to make them light and fluffy by incorporating air into them. You don't want any of the whites (clear bits) floating in the mix and you want to see lots and lots of little air bubbles—that's when they're perfect. Aside from some egg preparation and cooking techniques, we all got a chance to make crepes (which were later used to make cheese blintzes), and each kitchen was assigned a different breakfast item to prepare and cook for the class. My kitchen made cinnamon french toast, and other kitchens made cheese blintzes and pancakes, then we brought all of the dishes together and had a breakfast smorgasbord.

I must say, I make a pretty mean omelet and my crepes weren't half bad either, and I've been eager to show off my breakfast cookery skills. I had a chance to do just that during my Labor Day Weekend visit to my cousin's place in D.C., but I'd promised my parents I'd make them a big Sunday brunch as soon as we had a weekend at home. This past weekend was just that, and yesterday, I planned out a big Sunday brunch of made-to-order omelets and crepes filled with fresh whipped cream and ripe strawberries. Now, making the omelets was a little tricky, because in class, we used the salamander (essentially, a broiler), but I was just using the broiler setting in my oven at home. The crepes were pretty easy to do, though it took me a little while to master the technique of flipping them without tearing them (because they're so thin, they're pretty fragile). Because everything was basically done one at a time (make one omelet, then another; make one crepe, then another), I didn't really get a chance to sit down and eat with my parents, and it was a long brunch, but I'd still call it a success (especially since everything was so delicious).

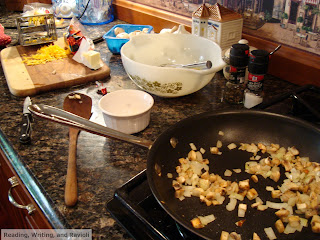
Sauteing mushrooms and onions for my dad's omelet...and making a mess on the counter while I do so.

Now, first things first: omelets. As I said above, the keys to a great omelet are to properly whisk the eggs and to not burn or brown the eggs as they're cooking. I kind of failed on that second key point (though I'm still including a picture), but I was adapting to an oven broiler as opposed to a salamander and figuring out the right amount of heat for our stove (which is different than the restaurant-grade stoves we use for class). Omelets can be simple and just be filled with cheese and maybe ham or sausage, but you can stuff them with just about anything you want. My mom requested tomatoes, spinach, and cheddar cheese. My dad was eager to eat an omelet stuffed with mushrooms, onions, and cheddar cheese. I opted for spinach, onion, and cheddar cheese. (Guess we all really like cheddar cheese...) Whatever you choose to fill the omelet with won't cook very long in the egg, so I recommend lightly sauteing those ingredients first (especially harder ingredients, like onions and peppers)—sauteing helps soften and release some of the flavor of the ingredients. Now, onto some omelet-making instructions...

Turn on the broiler in your oven. Heat a medium skillet (nonstick is best) over medium high heat. Add a little bit of butter (about a tsp.) to the pan, and once it's melted, add your omelet ingredients (the stuff you're putting in the omelet) to the pan and saute lightly for a few minutes. Remove the ingredients from the pan and set aside. Wipe the pan out and return to medium-high heat. Melt a little butter in the pan, then add the well-whisked egg to the pan. Gently push the edges of the egg inward and let the still uncooked, wet egg pool out into the edges of the pan (this helps cook more of the egg, and do it faster). Do this just a few times (but not too many times, because then you'll just end up with gently scrambled eggs...and yes, next time I do a tutorial in a post, I'll include pictures), until the middle of the egg is wet looking, but slightly cooked underneath. Add the filler ingredients (what you sauteed earlier), then place in the oven, under the broiler, for a minute or two, until the top looks cooked.

Mmmm...look at all that melted cheese.

Now, when you pull the skillet out of the oven (using an oven mitt, because that handle will be HOT), set it on a flat surface. You can fold the omelet in half, then plate it, or you can make it a little nicer and fold it twice—fold one side to the middle and then the other to the middle, slightly overtop of the already folded side. Flip over onto serving plate, so that the folds are on the bottom. If you want a pretty plate, top the omelet with some of the ingredients used to stuff it. My presentation is not very pretty, but to be honest, I had already made two omelets and I was starving, so I took the picture as fast as I could. Big mistake for a food blogger, but oh well.

If you do it right, your omelet won't be brown like mine. It'll be golden-yellow. Also, I should have sprinkled some spinach on top for color. Alas and alack. For once, beating my hunger was more important than taking a great picture.

So, now that the omelets are done, it's time for crepes. Crepes can be sweet or savory, and kind of like omelets, there's a lot you can fill them with. My favorites include berries and fresh whipped cream, as well as bananas and Nutella, but you can fill them with a variety of other ingredients. The recipe I'm sharing comes from my culinary arts class textbook, On Cooking, and, though I halved the recipe (going from 30 to 15), I still managed to get about 20 crepes (plus one or two rejects). Crepes are typically cooked in a special crepe pan, but a small, nonstick skillet will work just as well. They're a little tricky to flip, and I recommend using a spatula and having a fork on hand in case you need something small to help with flipping. Oh, and sorry for the measurements in ounces. Just weigh the ingredients on a kitchen scale (but be sure to weigh whatever it is you place the dry ingredients on/in first, so you can figure that out of the total weight).


Yields: Approx. 20 
Prep time: 30 minutes to an hour
Cooking time: 1-3 minutes per crepe
Difficulty: Moderate

Ingredients
  • 3 whole eggs
  • 3 egg yolks
  • 6 fl. oz water
  • 9 fl. oz. milk
  • 3 oz. sugar
  • 1/2 tsp. salt
  • 7 oz. flour
  • 2.5 oz. unsalted butter, melted
  • Butter (for the skillet)

Directions
Whisk together the eggs, egg yolks, water, and milk, then add the sugar, salt and flour, and whisk together. Stir in the melted butter (after you've let it cool just a bit). Cover and set aside to rest for 30 minutes to an hour before cooking.
Heat a small skillet over medium high heat. Add just a little bit of butter (seriously, a little bit goes a long way; if you add too much, it'll make your crepes greasy). Pour in a spoonful of batter (use a large serving spoon) and swirl it around in the pan to coat the bottom evenly. Don't pour in too much batter—you aren't making pancakes, you're making thin crepes, so you don't need much. Cook until the crepe is set, and looks slightly dry around the edges and in the middle. Carefully flip over and cook until the bottom is lightly browned. Remove from pan. Serve hot or let it cool first, and serve with whatever fillings you want. Repeat this process until all of the batter is used up (don't chill or freeze the batter, then try to use it later). Crepes can be kept briefly in a warm oven while you continue to cook more. Leftover crepes can also be stored in the fridge for 2 or 3 days or frozen for a few weeks.

So that's my lengthy brunch post. Despite it being a long and busy morning, the food was definitely worth it. Savory omelets, perfectly fluffy and hot, plus sweet, warm crepes filled with fresh whipped cream and ripe strawberries....breakfast doesn't get much better than that.

Saturday, September 17, 2011

Recipe: Vanilla Buttercream Frosting (for Caribbean-themed vanilla cupcakes)

A few weeks ago, I found a recipe for these beautiful seaside-themed cupcakes, topped with molded chocolate seashells and pale blue frosting—gorgeous! I showed them to my mom and asked if she had any need of them for an upcoming event and, lucky for me, she had a Caribbean-themed potluck dinner going on tonight that would be the perfect place for them. She picked up ingredients for them yesterday afternoon and we made a change of plans when she found some Swedish Fish packages that included fun multicolored sea creatures. My seaside-themed cupcakes became Caribbean-themed vanilla cupcakes, topped with homemade vanilla buttercream, hand-colored sanding sugar, and assorted Swedish Fish shapes. Fun, tasty, and perfect for any ocean-themed party! I used a boxed French Vanilla cupcake mix (yes, I know...I should be ashamed of myself for not making homemade batter, but I wanted this dessert to be as easy and quick as possible). What I'm sharing here is my recipe for buttercream frosting. I absolutely hate that disgusting, fluffy, oily frosting they use at grocery stores and cheap bakeries and ice cream shops. I'm also not really a fan of the pre-made stuff they sell to go along with boxed cake mixes. I like thick, substantial icing, with a rich, yet creamy texture and flavor. This buttercream frosting, adapted from a recipe from Anne Bryn's The Cake Mix Doctor, is thick without being stiff and it has a delicious vanilla-and-sugar flavor.

One of these things is not like the other. Haha. Gotta love the random green fish.

Yields: About 2 cups (the original recipe said it yields 3.5 cups, but I definitely got less and ended up needing to make a second batch). Two batches will be enough to cover approx. 24 cupcakes with a nice thick swirl of frosting)
Production Time: 10-20 minutes
Difficulty: Easy
Special equipment: Electric mixer

Ingredients
  • 1/2 cup (1 stick) unsalted butter, room temperature
  • 4 cups powdered sugar, sifted (sifting removes lumps that would clump up in the frosting) 
  • 2 tsp. vanilla extract
  • 3-4 tbsp. milk

Directions
Put the butter in the mixer bowl and, using the paddle attachment, blend it on low for about a minute until the butter is a little creamy. Turn off the mixer and add the powdered sugar, milk, and vanilla to the bowl. Blend the mixture on low for about a minute, until the powdered sugar is incorporated into the wet ingredients. Increase the speed to medium and whip until the mixture is completely blended and looks thick and creamy. If you find it's not holding its shape or seems to be "melting" on top of the cupcakes or cake you're putting it on, add just a little more powdered sugar to thicken it up (don't add too much, because it'll make your frosting gritty and dry-tasting). The frosting can be spread on cupcakes or cakes with a knife, but I used one of my "fancy" frosting tips for my culinary classes, fashioned myself a pastry/piping bag out of a Ziploc back, and piped the frosting in a simple swirl on top of of the cupcakes. Turned out great!


This is a great basic buttercream that can easily be altered to suit your needs. Add food coloring, mix in a flavor other than vanilla (like orange extract or cocoa), or mix in finely chopped ingredients (like nuts or chocolate chips) to make it perfect for any cake. For my Caribbean-themed cupcakes, I just added a few drops of blue food coloring to achieve a pretty pale blue color. That, topped with blue sugar and fish decorations made for some fun and tasty cupcakes!

Friday, September 16, 2011

Recipe: Chicken Piccata

I haven't really had time to grocery shop this week, and no, I don't really have a legitimate reason why. It's just been one of those lazy weeks (oh, and it's been around or below 58 degrees for a few days, which means I've been snuggling up in blankets and dreaming of my college days in sunny South Carolina instead of being productive). So, that being said, I wanted an easy, delicious recipe for last night's dinner, and a classic chicken piccata from Giada De Laurentiis fit the bill. Bright, lemony chicken served with warm pasta, drizzled with a light sauce straight from the chicken-sauteing pan makes for a light, delicate meal.

My measurement conversions were a little off, so the recipe didn't yield as much sauce as it normally would, but what sauce I did get was delicious and if you follow the measurements I list below, it'll work out just right

Serves: 4
Prep. time: 10 minutes
Cooking time: 20 minutes
Difficulty: Easy

Ingredients
  • 1 lb. (1 box) spaghetti or angel hair pasta
  • 4 boneless, skinless chicken breasts (pound them out a bit so they cook more evenly)
  • A dash of salt and pepper
  • Dried lemon peel
  • All-purpose flour (about 1 cup)
  • 4 tbsp. unsalted butter
  • 2 tbsp. extra-virgin olive oil
  • 1/2 cup chicken broth
  • 1/3 cup fresh lemon juice (from about 2 lemons; I used bottled juice)
  • 1/4 cup drained capers, rinsed
  • Dry white wine, if desired
  • Dried parsley, to garnish

Directions
Mix the salt, pepper, and dried lemon peel into the flour. Dredge the chicken in the flour to coat it lightly. In a large saute pan/skillet, melt 2 tbsp. butter with 2 tbsp. olive oil over medium-high heat. Add the chicken, lightly browning both sides and cooking through slightly, then use tongs to remove them and set them aside on a plate.
In the meantime, bring a large pot of salted water to a boil and cook the pasta according to the instructions on the box. Drain and return to pot, drizzle with a little olive oil, and cover with lid to keep warm while the chicken continues to be cooked.
Add the broth, lemon juice, capers, and a splash of dry white wine (about 1-2 tbsp.) to the pan that you used to cook the chicken. Bring the mixture to a boil over medium-high heat and use a wooden spoon or spatula to scrape the brown bits from the bottom of the pan (they add extra flavor). Return the chicken to the pan and simmer until the chicken is cooked through. Using tongs, place the chicken on a clean plate. Whisk 2 tbsp. butter into the sauce left in the saute pan. Serve the chicken atop the pasta, and ladle the sauce over them. Garnish with parsley. Italian cheese may be added if desired.

This dish is quick and easy, but packed with flavor. The lemon juice and dry white wine add bright acidity to the dish, while the butter and chicken stock add a soft, smooth flavor. Dredging the chicken in seasoned flour creates a delicate coating on the chicken that browns beautifully in the pan. This dish is bright, lemony, and perfect for a cool summer night.

Recipe: Sugar Cookies with Hand-Colored Sugar Sprinkles

I made these cookies as a gift for my boyfriend, who just celebrated his 23rd birthday a little less than a week ago. I was really bummed out that I didn't get to celebrate his birthday with him in person, so I wanted to make sure he got a great birthday package, full of goodies, in the mail. Along with my little collection of fun, geeky gifts from ThinkGeek.com, I wanted to include something that was a little more personal. Being the chef-wannabe that I am, I thought I'd make him homemade cookies, with some sort of handmade decorations. I sent him a surprise care package earlier this summer with chocolate chip cookies, so I wanted to make something new. He'd mentioned once that his family makes sugar cookies around Christmas time, so I found a recipe in The Cook's Encyclopedia of Cookies that looked just right. The result of my baking efforts: lightly golden-brown cookies cut into star and heart shapes, generously sprinkled with rainbow-colored sugar. Girly and reminiscent of a bowl of Lucky Charms? Yes. Delicious? Indeed. Appreciated by my boyfriend? I sure hope so. ;D


Yields: Approx. 36 (depending on the size and type of cookie cutter you use, you'll have more or less)
Prep. time: 10-15 minute prep., 30 minutes to chill cookie dough
Baking time: 10-12 minutes per sheet
Difficulty: Easy
Special equipment: Electric mixer

Ingredients
  • 3 cups all-purpose flour
  • 1 tsp. baking soda
  • 2 tsp. baking powder
  • 1/2 tsp. grated nutmeg
  • 1/2 cup (1 stick) butter or margarine
  • 1 cup sugar
  • 1/2 tsp. vanilla extract
  • 1 egg
  • 1/2 cup milk
  • Various colors of sanding sugar or (if you want to dye your own, which is pretty fun—directions listed below) white/clear sanding sugar and food coloring (red, yellow, and blue)

Directions
Sift the flour, baking soda, baking powder, and nutmeg into a small bowl, then set aside. With a mixer, blend together the butter/margarine, sugar (not the sanding sugar), and vanilla extract until the mixture is light and fluffy. Add the egg and beat well into the mixture. Add the flour mixture alternately with the milk (one and then the other, back and forth) to make a soft, semi-sticky dough. Wrap the dough in plastic wrap and chill in the refrigerator for at least 30 minutes.
Preheat the oven to 350*F. Roll the dough out on a lightly floured surface (keep the flour around, because you'll likely need to add more to the surface to keep the dough from sticking to it). Roll it to about 1/8 inch thickness. Cut into rounds or other shapes using floured cookie cutters. Transfer cut cookies to ungreased baking sheets.

To make the colored sugar: Place a piece of wax paper on a flat surface a put a small pile of sanding sugar on the paper (not too much sugar...just a few tablespoons...you can always make more if you find that the cookies don't have enough sugar topping). Add one drop of food coloring to the sugar and smooth a rubber spatula over and through the sugar, blending the color into the sugar. The color should be light and even throughout the sugar—you want to avoid clumps of sugar that are dark and coated with too much food coloring. If you want a darker color, add more food coloring, but only one drop at a time, and only after blending that drop into the sugar. Repeat the process with fresh sanding sugar and the colors of your choice (for color mixtures, like red and yellow to make orange, add one drop of each color to the sugar and blend and repeat with one drop each if you want a deeper color). Once all of your sugar is dyed, spread it out on the wax paper and let it dry for a few minutes. Pour the dried sugar in a small bowl and stir with a spoon to mix.

Sprinkle the colored sugar onto the cookies on the cooking sheet, then bake the cookies in the oven for 10-12 minutes, until golden brown. Transfer cookies to a wire rack to cool completely.

Hand-dyed sugar

These cookies are light, with that perfect soft-yet-crunchy texture. The nutmeg adds a hint of warmth and the cookies are perfect with a glass of milk or a cup of hot tea or coffee. The easy-to-make colored sugar is a great alternative to icing/frosting (which, in my case, could easily have smeared and smushed on the cookies on their trip through the mail). The cookies are delicious, pretty, and perfect for a birthday gift, Christmas cookie platter, or just to have around the house for a sweet snack.

Monday, September 12, 2011

Pasta Shells with Mixed Greens and Italian Cheese

After eating hotdogs and french fries at the PennState game on Saturday, and spending Sunday evening lounging at a restaurant in the mountains, eating lightly fried goat cheese, filet migon with tomato beurre blanc, and decadent triple chocolate mousse, I wanted a light meal for dinner tonight. Now, while some might not consider any pasta dish a light meal, I think a pasta dish with little or no sauce, lots of veggies, and just a sprinkling of cheese is filling, without making you feel heavy and lethargic later. This is a variation on a Giada De Laurentiis recipe, and it's quite possibly the quickest, easiest meal you'll ever make—it's so light and delicious too!


Serves: 4
Prep. time: 5-10 minutes
Cooking time: 11-14 minutes
Difficulty: Easy

Ingredients
  • 1/2 lb. (8 oz.) medium pasta shells
  • Approx. 4 oz. mixed baby greens, washed and left whole (I used 2-3 big handfuls)
  • 8-10 basil leaves, washed and left whole
  • 1/4 cup sun-dried tomatoes (packed in olive oil), chopped
  • 1/3 to 1/2 cup shredded Italian cheese (I used a mix of Pecorino-Romano and Parmigiano-Reggiano)
  • Salt and pepper, to taste
  • Garlic powder, to taste
  • Approx. 1/4 cup olive oil from the jar of sun-dried tomatoes (it's infused with the flavor of the tomatoes and it adds a delicious flavor to the dish)

Directions
Bring a medium pot of salted water to a boil. Cook the pasta according to the package instructions (approx. 13 minutes). Drain the pasta, but reserve about 1/3 cup of the pasta water. Place the salad greens on the bottom of the pot that you used to cook the pasta in, then put the drained pasta back on top. Toss to combine, pour the reserved cooking liquid over the mixture, then place the lid on the pot and let the heat from the pasta help wilt the greens. After a minute or two, toss in the sun-dried tomatoes and cheese, and add some salt, pepper, and garlic powder. Drizzle the sun-dried tomato olive oil over the mixture and toss to completely combine. Serve topped with more cheese if desired.

This dish is so simple and light, but the sweet, tangy sun-dried tomatoes and nutty, salty Italian cheeses add a ton of flavor to the dish without adding a ton of calories. The wilted greens add color and a fresh taste, while the sun-dried tomato oil lightly coats all of the tender pasta shells and creates a delicate sauce. We ate dinner out on the back porch, enjoying the cool evening air and some white wine from a favorite vineyard in North Carolina and it was perfect.

    Friday, September 9, 2011

    A week without posted recipes does not mean a week without cooking

    So, it's been a while since my last post, but that doesn't mean I haven't been cooking. In fact, between my culinary classes, cooking at my cousin's place during my trip to the D.C. area this weekend, and a few simple cooking and baking adventures in my kitchen during the past few days, I've gotten a good bit of time in in the kitchen, but, sadly, I don't really have much in way of recipes or pictures to share. Despite this, I thought I'd write a post to sum up the past week, because I've eaten some delicious foods and cooked some fun stuff during this stretch of time.

    First things first: Culinary classes (in particular, my Friday class, Foods 1, because Basic Culinary Skills on Wednesday basically just involves practicing knife cuts and prepping basic ingredients for the second year students). During my last Foods 1 class, last Friday, we finally got into the kitchen to do some cooking—it was Breakfast Day! I learned how to properly flip an egg in a pan...contrary to what you might think you'd do or what you might be tempted to do—thrust the pan forward and up—you use a small pan with sloping sides (your everyday skillet, basically), tip it downward and forward so the egg slips down onto the sloped edge, and then you jerk the pan straight back in one quick, steady motion, causing the egg to flip over backward and onto the uncooked side. Pretty cool! We practiced over sinks, so any mess-ups would just go down the drain. I didn't flip any out of the pan, but I was a little gentle while flipping, which meant I got a few half flipped eggs before I learned to do it properly. Other foods on our menu that day: cheese omelets (mine was perfect!—really need to ask if I can bring a camera to class so I can document), cheese blintzes (not my favorite...a little too savory tasting), French toast, and pancakes. Definitely a successful day in the kitchen!

    My breakfast skills got some good use this weekend during my visit to my cousin's apartment in D.C. She's a big reason I started cooking, so it was great to spend time with her in the kitchen again. I showed off my egg flipping skills, made a pretty damn good omelet for her boyfriend, and we made crepes with strawberries and fresh whipped cream. Besides our joint breakfast ventures, she made flaky, buttery scones my first morning there and we filled up on french toast another morning, so, needless to say, we dined well in the mornings. She had a hearty crockpot meal waiting for me when I got in on Friday night, and we made pad thai for dinner one night and potato soup another night (okay...she did pretty much all of the work on those two, but I got the recipes and you should expect to see them up here later). We also roasted marshmellows over candles, drank lots of tea, and she introduced me to the joys of Whole Foods one afternoon. We spent Sunday at the Maryland Renaissance Festival, which was a blast—I haven't been to a renaissance festival since middle school, so it was fun to check out the shops, the shows, and the great costumes. Another great part of the day?—The food! I ate steak on a stake (a little hard to eat, but tasty), chocolate-covered cheesecake on a stick (AMAZING), and part of a deep-fried Snicker bar (not really that great). All in all, I had a great weekend and a lot of fun with lots of food.

    Easily my favorite thing at the Renaissance Festival: the glass blower in the leather shorty-shorts.

    I didn't get home from my cousin's place until Tuesday evening, and with class on Wednesday, that meant no dinner to make after class (too tired on class days). Thursday, I tried out Patak brand Tikka Masala sauce and made a basic chicken tikka masala with basmati rice. It was pretty good, though the flavor of the sauce was not as strong as I would have hoped it would be, but for an Indian sauce in a jar, it was pretty good.

    Chicken Tikka Masala in its most basic form

    Today, my Foods 1 class had a Salad Bar day. We made mayonnaise (and whipped it by hand, which was a bit of work, though well worth it), and from there, each kitchen was assigned to make either Roquefort dressing, Thousand Island dressing, Caesar dressing and salad, or an emulsified vinaigrette (my kitchen made the Roquefort dressing, which is a variation on basic blue cheese—it was tangy and delicious!). We learned the proper washing technique for salad greens, familiarized ourselves with the various greens used in salads (from peppery arugula to your basic green leaf lettuce), and we got to build our own salads and sample our dressings. Our healthy lunch definitely made me feel a bit better about the chocolate-covered cheesecake on a stick and hearty breakfasts I consumed this past weekend.

    I'm spending Saturday at State College at the PennState v. Alabama game, then traveling to visit both of my grandmothers on Sunday, so I won't have a new recipe up until Monday night, but I'm definitely excited to try out some new recipes this week!

    Thursday, September 1, 2011

    Crispy Chicken with Creamy Italian Sauce, Farfalle, and Asparagus

    My latest obsession is the website Pinterest, a virtual collection of pinboards that you can personalize to suit your interests. I've got boards like "My Style," "Dream Kitchen," and "My Wishlist," but my favorite by far is my "Recipes to Try" board, where I can save pictures of amazing dishes that are linked back to the original website where they're featured. This is a fantastic way for me to save all of the delicious-looking recipes that I see online and get to appreciate the visual nature of the pinboard, filled with pictures of these scrumptious meals (way better than saving links in my Bookmarks). One of the recipes I saved to this pinboard (featured here) is the one featured in this post. I needed a recipe to go along with some leftover asparagus we had in the fridge, and this dish looked perfect. The chicken is crispy like fried chicken, but much lighter and less fattening, and the creamy sauce is super easy to make—perfect for a quick weeknight meal.

    The creamy sauce was delicious on the pasta and I even mixed it in with my asparagus.

    Serves: 4
    Prep. time: 15 minutes
    Cooking time: 20 minutes
    Difficulty: Easy

    Ingredients
    • 3 skinless, boneless chicken breasts, pounded flat (about 1/2-inch thick)
    • 5 cups corn flakes
    • 3/4 cup flour
    • 1/2 tsp. salt
    • 1/2 cup milk
    • 6 tbsp. olive oil (or enough to cover the bottom of a large skillet)
    • 12 oz. farfalle (bowtie pasta)
    • About 1/2 of a bunch of asparagus
    For the creamy Italian sauce:
    • 1, 10 oz. container Philadelphia Cooking Cream (Italian Cheese and Herb Flavor)
    • 2 cans Cream of Chicken soup
    • 1 cup chicken broth
    • 1/2 cup milk
    • Fresh parsley, chopped (optional)

    Directions
    Preheat the oven to 400*F. Bring water to a boil and add the farfalle, cooking according to the package instructions (about 11-14 minutes). In the meantime, put the corn flakes in a food processor and pulse to crush the cornflakes into chunky crumbs (don't pulverize them into dust—you want your chicken breading to have some texture and crunch). Get three small pans or low, wide bowls (loaf pans or pie tins work too; I used three small, deep bowls and it was kind of tricky trying to fit the chicken pieces in them). In the first pan, mix the flour and salt. In the second, pour 1/2 cup milk. In the third, pour in the corn flake crumbs. Dredge each of the chicken breasts first in the flour (coating them completely), then dip in the milk (coating both sides) and immediately coat in the corn flakes. Heat the olive oil in a large skillet over medium-high heat. When hot, add the chicken to the pan, sprinkle with salt and pepper, and let it cook for about 5 minutes, until golden brown on the bottom. Flip the chicken over, reduce to medium heat, and cover the skillet, allowing the chicken to cook until the other side is golden brown and the chicken is cooked through, but still tender. Remove the chicken from the skillet, place it in a shallow dish, and cover the dish with aluminum foil to hold in the heat. Over medium-high heat and in the same skillet that the chicken was cooked in, add the chicken broth, Cream of Chicken soup, Philadelphia Cooking Cream, and milk and whisk together to blend. Let it heat up enough to bubble a bit and blend completely. In the meantime, place the asparagus in a shallow, oven-safe dish, drizzle it with olive oil, and sprinkle it with salt and pepper. Put the asparagus in the preheated oven and cook for 5-8 minutes, until bright green and slightly tender, but still crisp. Serve the pasta with sauce ladled on top, then top it with chicken and serve asparagus alongside.

    This is a great meal for a busy weeknight, because the sauce is incredibly easy to make and the meal is both delicious and filling. The cornflakes are a great alternative to breadcrumbs or panko and they add a great crisp as they cook in the olive oil (and hey, any leftover corn flakes in the box can be eaten for breakfast!). The creamy sauce is like a variation on alfredo—cheesy, studded with herbs, and oh-so-creamy. Crispy green asparagus adds a pop of color and can be served with the sauce on top too. So tasty!